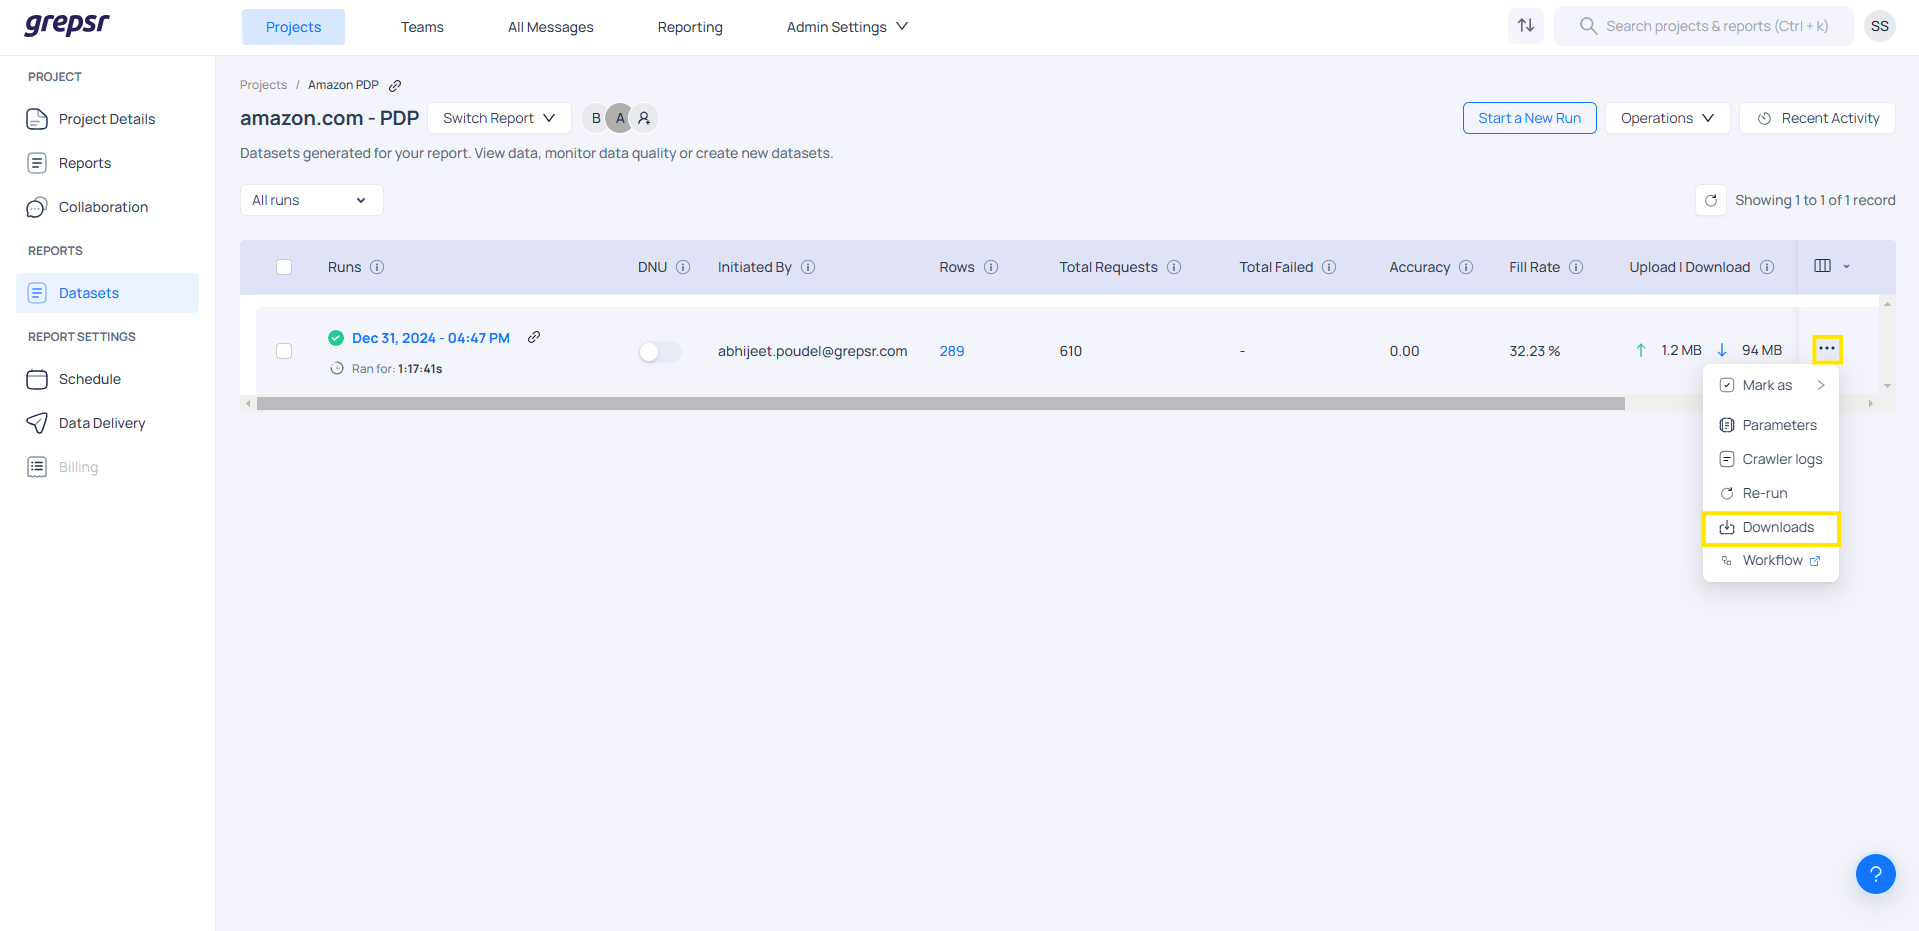
Datasets
You can find all available datasets in a report on the Datasets page. Datasets are arranged chronologically, with the most recent ones at the top. They are timestamped to indicate when they were extracted and color-coded to show their status:
-
Gray: Indicates that the run is in the Initializing or Provisioning state. Initializing means the request has been received in our system, while Provisioning means we are preparing resources to start the new run.
-
Orange: Indicates that the run is in the Processing state and data extraction is in progress.
-
Green: Indicates that the run is in the Completed state and data has been successfully extracted.
-
Red: Indicates that the run has Failed and denotes that extraction was completed with one or more errors.

You can click on the dataset to view its underlying data on the Data Preview page. Important quality metrics are also highlighted, making it easier to analyze trends and identify problems at a glance. Additionally, you can click on the different metrics to reveal how they have been trending.
Starting a new run
If you wish to initiate an on-demand run, you can do that from the Datasets page by clicking on Start a new run. All default admin and custom parameters are used by default; however, if needed, we can change the parameters on demand. Once the new run is initiated, a new record is added to the platform, displaying the status of the run.
Download your Datasets
Once you have set up a schedule and configured the delivery destination, the data will be delivered automatically when the schedule is complete. However, you can also download the data manually from the Datasets page. By selecting the Download section for a specific dataset, you will see the download information. To initiate the download, simply click the Download button.
Export data into different format
If you wish to export the data in a different format, you can manually export it by:
-
Go to the Report > Dataset page.
-
From the list, click on the three-dot icon next to a specific dataset and select Downloads.
-
The Data Delivery sidebar panel will open. You can choose to export the file in a supported format available in the platform.
-
If you wish to export specific columns or pages, you can select the columns from multiple pages and export them.
-
To export the entire dataset, click on Export and the exported format will be displayed.
-
If you wish to export and deliver the file, click on Process File Delivery Notifications. This will export the file and deliver it to the destination set in the Delivery Destination.
Partial Export
Partial Export is a feature that allows you to export only specific parts of your data, rather than the entire dataset. This is particularly useful when dealing with large datasets or when you need to share specific subsets of data with different teams and clients.
This feature is designed to give you more control and flexibility when handling large datasets, ensuring that you can choose exactly what you need. It offers a more efficient, tailored and practical approach to managing data. It’s ideal for you to streamline data processing, reduce unnecessary overhead and ensure you are sharing or exporting only what’s needed.
Steps for Partial Export
- Step 1: Navigate to the Projects page.
- Step 2: Type and Select a Project.
- Step 3: Once selected, you will be redirected to the Datasets page.
- Step 4: Click on the Three-Dot Icon.
- Step 5: From the dropdown menu, select the Downloads option.
- Step 6: In the available options, click on Export Data.
- Step 7: Choose the supported file format in which you would like to export or deliver the data.
- Step 8: By default, all data is selected for export, but you can choose specific columns or data to export as needed, whether it's a full or partial dataset.
- Step 9: Finalize the Export or Delivery.
- To export the selected data, click on Re-export.
- If you do not wish to proceed with the export, click Cancel.
- If you want to deliver the file, be sure to select Process file delivery notifications to notify relevant recipients.
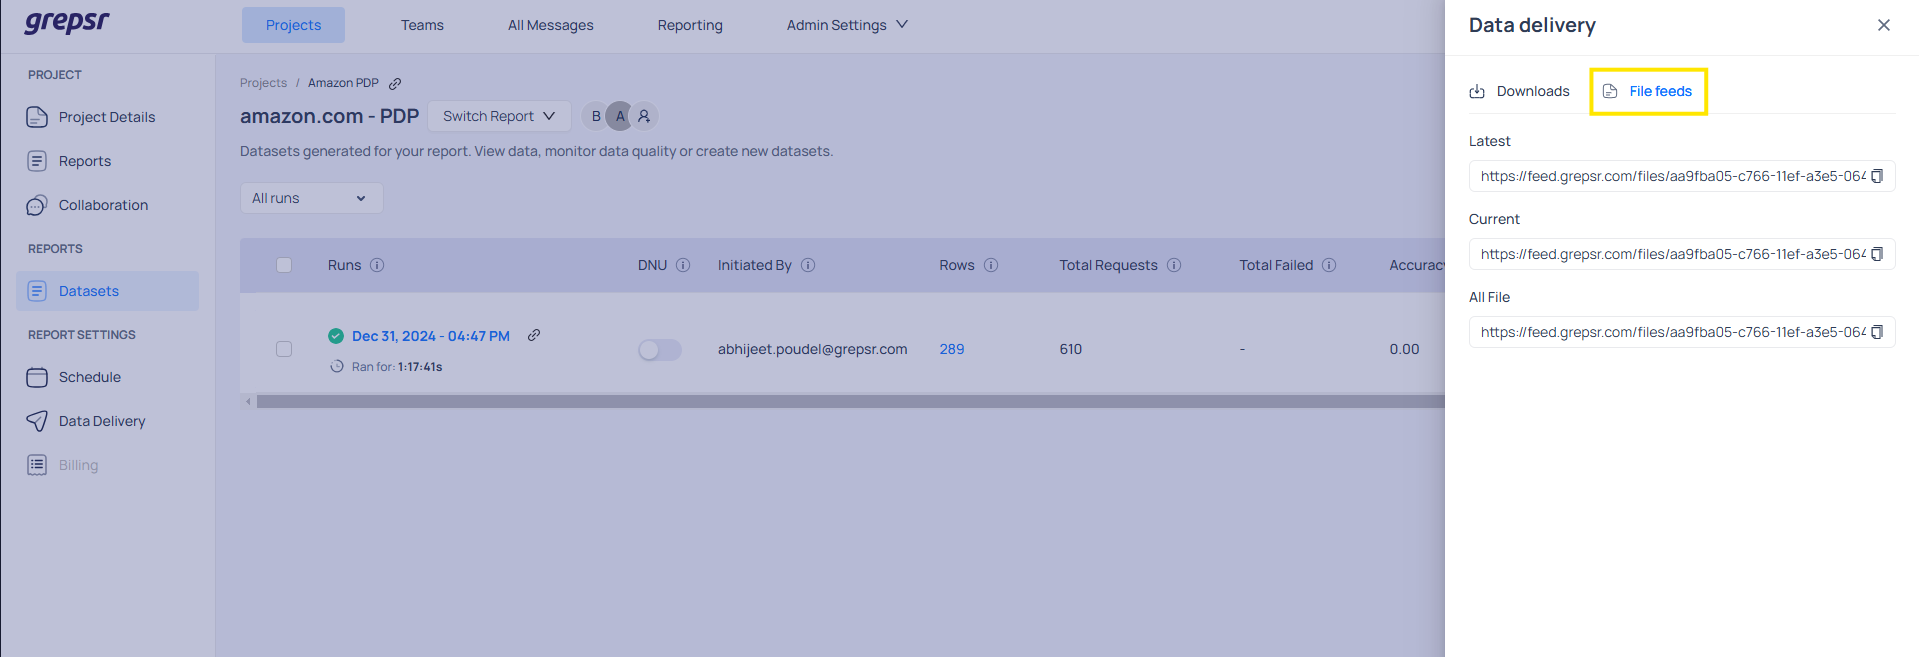
File Feeds
File Feeds are dataset feeds in XML format. A feed can be accessed via a unique URL. Each item in the feed, which corresponds to a dataset, contains metadata such as:
-
Project ID
-
Project Name
-
Report ID
-
Report Name
-
Timestamp (when it was generated)
-
Status
Feeds provide an additional option to automate the flow of data in the customer’s platform. To locate a file feed for a report:
-
Go to the Report > Dataset page.
-
From the list, click on the three-dot icon next to a specific dataset and select Downloads.
-
The Data Delivery sidebar panel will open.
-
Click on the File Feed tab in the drawer. Here, the three feeds mentioned are listed. Click on the Copy icon to copy the feed URL to your clipboard.
Types of File Feeds
-
Latest Feed: Links to the most recent dataset that was fully processed.
-
Current Feed: Links to the specific dataset that is currently being viewed.
-
All Feed: Contains a link to all the dataset in the report since beginning.
Delivery Trails
You can check the delivery details in the Delivery Trails. When you click on any of the delivery statuses, an extended view of the delivery is shown. This section provides a record of whether the required file formats were delivered to the correct destinations and confirms whether the delivery was successful.
Delivery statuses
| Status | Description |
|---|---|
| Exporting | The dataset is currently being written to a file. |
| Skipped | Delivery was intentionally skipped during manual run or manual export. |
| Delivered | Files have been successfully delivered to the correct destinations. |
| Failed | The delivery was not successful; all files failed to deliver. |
| Zipping | The file or folder is being compressed. |
| Uploading | The exported file is currently being uploaded to cloud. |
| Not Notified | The delivery destination has not been set. |
| No Records | There is no available data or files to deliver. |
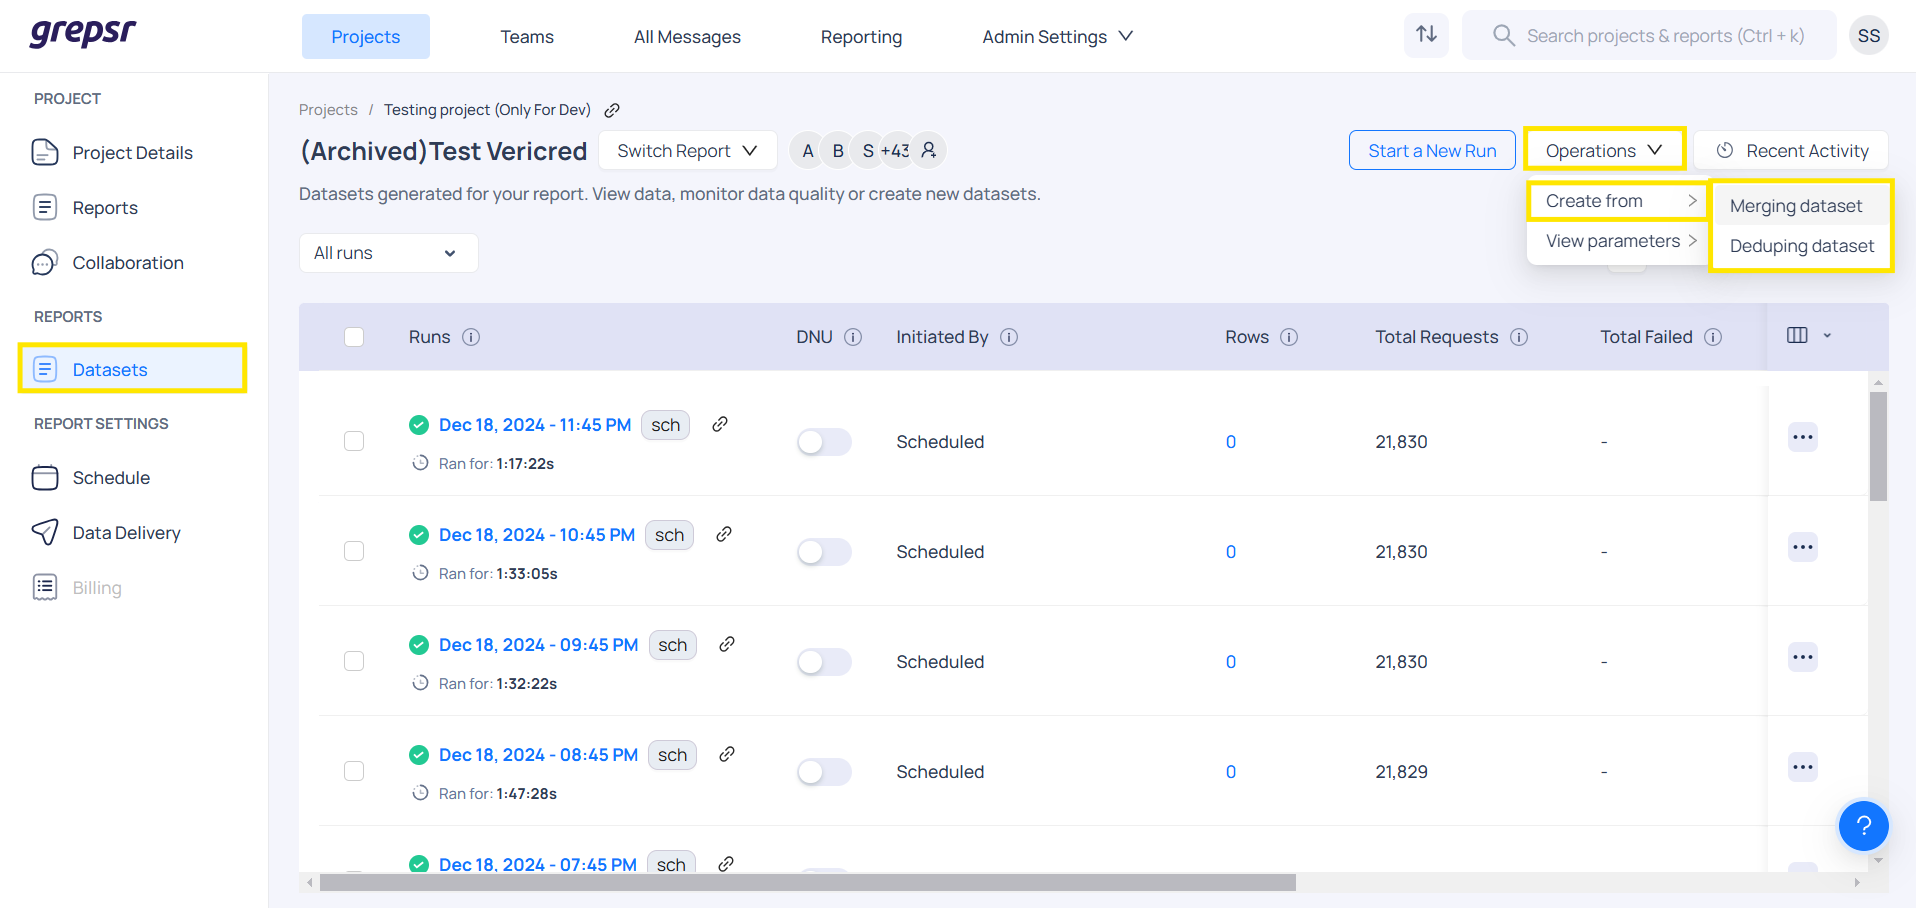
Merge and Dedupe Datasets
If you want to merge the contents of individual runs, you can use the Merging dataset option on the Datasets page. You can select up to 50 runs to merge the datasets. You can also configure the merge to remove duplicates by selecting the Deduping dataset checkbox. Additionally, you can remove duplicates from individual runs using the Dedupe functionality in the Operations button on the Datasets page.
Custom Data Import
The Custom Data Import feature allows you to upload custom datasets and deliver them in a format tailored to your clients’ requirements. This functionality streamlines the process of transferring curated data directly to client destinations, ensuring flexibility and efficiency.
It enables to:
-
Upload datasets in their preferred structure.
-
Deliver the data directly to client destinations.
-
Monitor delivery status and download files for review.
-
Incorporate file feeds as part of the imported data.
Steps to upload and deliver the dataset
-
Step 1: Begin by selecting the Import Dataset option on your dashboard.
-
Step 2: Choose the file(s) you want to import. Supported file types may include CSV, JSON (based on platform capability).
-
Step 3: If you wish to send the file to a destination, enable the Process File Delivery option.
-
Step 4: Once your selections are made, click Upload to import the dataset into the platform.
-
Step 5: To download your imported data or view available download links, navigate to the Downloads section.
-
Step 6: Click on Delivery Status to view the progress and history of file delivery trails.
-
Step 6: If needed, you can integrate File Feeds within the imported data too.
Partial Row Export
The Partial Row Export feature allows you to export only specific rows from a dataset by applying filters, rather than downloading the entire dataset. This is especially useful when you need only a subset of data based on certain conditions. It makes the process faster, more efficient and easier to manage especially when working with large datasets.
With this feature:
-
You can apply filter criteria to narrow down your data.
-
Export up to the first 100 matching records based on your filters.
-
Quickly download only the data that’s relevant to your needs.
Steps to Use Partial Row Export
-
Step 1: Start by navigating to the Datasets page on the platform.
-
Step 2: Click on the Run you want to export data from.
-
Step 3: Click the Filter button to begin filtering your data.
-
Step 4: From the dropdown menu, select the Field you want to filter by.
-
Step 5: Select the Condition you want to apply.
-
Step 6: Type in the Value you want to filter for.
-
Step 7: Click on Apply to filter the data based on your criteria. The matching data will be displayed on the screen.
-
Step 8: At the bottom of the screen, enter the Number of rows you want to export.
-
Step 9: Click on Export Data to download the filtered records.